The Main Window
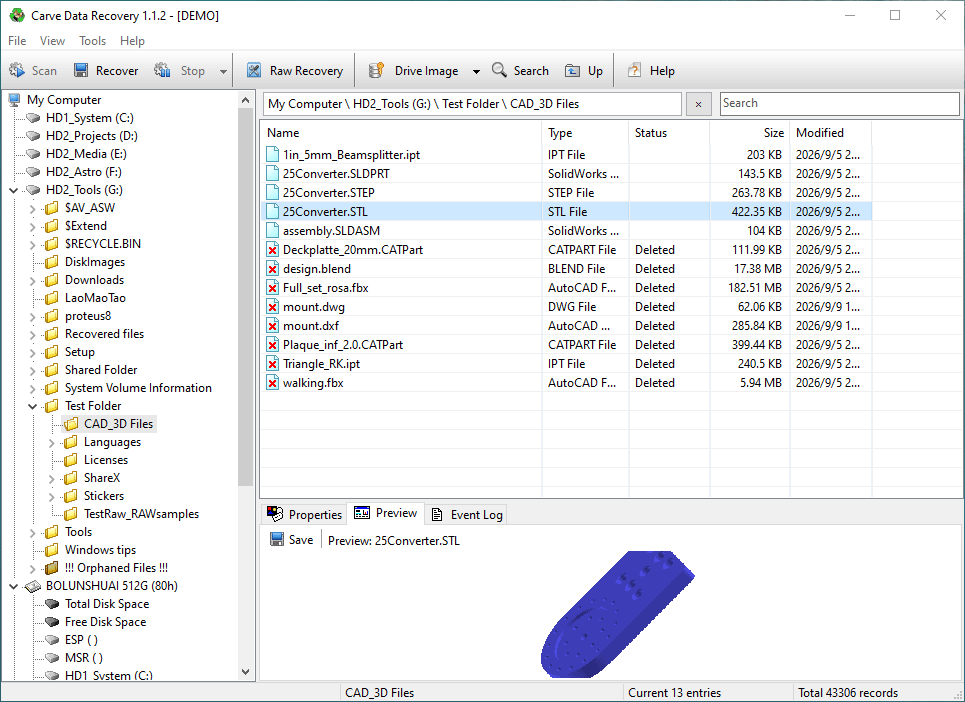
The window has three parts: the object tree on the left, the file list on the right, and a set of panes below the list. The status bar along the bottom reports progress and what the program is doing.
The object tree
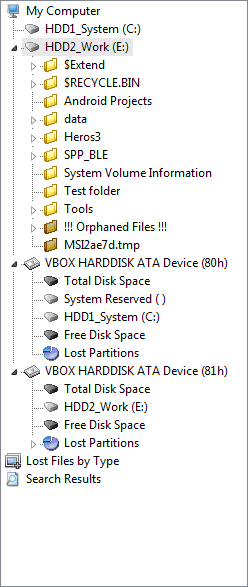
Everything you can scan or recover from is a node in the tree. Under My Computer you will find:
- Fixed drives and removable drives, with their partitions underneath.
- Lost Partitions - volumes found by Search for Lost Partitions.
- Free Disk Space - the unused regions between partitions.
- Total Disk Space - the whole drive as a single object, listed first under a drive or an image whose partition table could be read.
- Drive images that have been loaded.
Total Disk Space exists so that a whole drive can be searched in one pass. A drive whose partition table is intact is listed as its individual partitions, and each of those can be scanned on its own - but the drive itself cannot, so scanning every partition would mean running a scan per partition. Total Disk Space is the same disk treated as one object: one scan covers all of it, and the results are listed under the one node. It is not a partition and has no file system of its own, which is why its properties show no serial number and no file system.
A drive whose partition table is gone does not get a Total Disk Space node - its Free Disk Space node already covers the whole drive and can be scanned directly.
A partition that is larger than the image it was loaded from is marked [partial]; a partition that lies entirely outside the image is marked [not in image] and greyed out. Both are still listed, so that the source drive is described completely, but their contents cannot be read.
Alongside My Computer there is one more top-level node, Lost Files by Type. It holds one entry per file type, and each entry lists the lost files of that type found by the scan - a shortcut for when you know what you are looking for but not where it was. See File Types for how the list of types is managed.
A node that has been scanned keeps its results until the drive list is refreshed.
The path bar
Above the list is a bar in two parts. On the left is the path of the folder being shown, as a breadcrumb - HD1_System (C:) > Windows > System32. Pointing at one segment highlights it; clicking it jumps straight to that folder and selects it in the tree. Right-clicking the bar copies the whole path to the clipboard.

On the right is a filter box. Typing in it narrows the list to the rows that contain the text; the button beside it clears the filter. The filter belongs to the folder on screen and is reset when another folder is selected.
The file list
The list shows the contents of whatever node is selected. The columns are Name, Type, Status, Size, Modified and LBA. The Status column is where you see Deleted for a file that was found as a deleted entry, and where a damaged folder is marked.
Click a column header to sort; click it again to reverse the order. Use Ctrl and Shift to select more than one row.
Right-click menus
Right-clicking a node in the tree, or a row in the list, opens a menu that acts on that object: Standard Scan, Advanced Scan, Search for Lost Partitions, Recover, Statistics, Open Directory, Preview. Entries that do not apply are greyed out - the scan entries are available only when exactly one drive or partition row is selected, Recover only when at least one file or folder is selected, and Statistics only when the selection contains something that can be counted. See Statistics.
The panes
- Properties - the fields of whatever is selected: the geometry of a physical drive, the capacity and file system of a partition, the dates of a file. See The Properties pane.
- Preview - the contents of the selected file, read straight from the drive. Images, documents, archives, video and audio are shown in a view of their own; anything else is shown as a hexadecimal dump. This is how you tell an intact file from a damaged one - or from one whose data has already been erased - before spending time on recovering it. Previewing is free and there is no limit on how many files you look at. See Preview.
- Event Log - a running record of what each scan, recovery and drive operation did, with the time and the outcome. Save to file writes the whole log out; that file is what support will ask for first.
Show or hide each pane from the View menu.
The toolbar
- Scan - opens the scan mode dialog for the selected node.
- Recover - recovers the selected files.
- Stop - stops the scan or recovery that is running. The arrow to its right opens a menu whose Stop (Save Scan Progress) entry also writes a checkpoint, so that the scan can be resumed later - see Save and Resume a Scan.
- Raw Recovery - opens the window that lists the files found by carving - see Raw Recovery.
- Create Drive Image and Load Drive Image.
- Options - the program settings.
- Help.
The status bar
The left hand section is the progress of the current operation. The middle section describes what is happening now, including the stage reached during a long scan. The right hand section counts the records that have been collected.
Related topics
More in Getting to know it
- OverviewCarve Data Recovery is a file recovery utility for FAT, exFAT and NTFS volumes. It brings back files that were deleted, lost to an accidental format, or left…
- What's NewWhat this version of Carve Data Recovery added: exFAT and 4Kn support, recovery from damaged media, Raw Recovery, previews, finding files and drive health.
- InstallationCopy the program folder anywhere on a drive that is not the one you are going to recover from, then run CarveDataRecovery.exe.
- The Properties PaneThe pane at the bottom right of the main window has three pages: Properties, Preview and Event Log.
- Quick TutorialA seven-step walkthrough of a recovery: pick the drive, choose a scan mode, preview what was found, then recover to a different drive and read the summary.